Turtle
Forward and turn
 Français ici !
Exercise 1: Forward, turn
Click on
,
then write
Write
the following code in the zone to the right of the screen then click on
 !
!
                forward(50)
                left(90)
                forward(100)
                right(45)
You should have seen a turtle move forward by a distance of 50, then turned left 90 degrees, moved forward again by a distance of 100 and finally turned right of 45 degrees.
Try now the code containing the first line only (delete the other ones), what does this code do?
Don't forget to click on .
Try now the code with the two first line only, same question.
Add now the third, run the code, understand why the turtle moves like that, add the fourth line, run and understand the move of the turtle.
With the experiments you just did, explain in plain english what the forward command do? What about the left and the right commands?
If you want to have two different windows to code and follow the tutorial, click on , then in a new windows go on this page. One way to do that is to right click on the link and select open in a new window from the menu.
I suggest to put the two windows next to each other, around ⅓ of the screen for this windows and therefore ⅔ for the code and the rendering of the turtle.
Exercise 2: Turtle shortcuts
To write forward is exhausting, there exists a shortcut fd.
for Left Turn and Right Turn,
there exist the shortcuts lt and rt.
What is this code doing?
                fd(100)
                lt(120)
                fd(100)
                lt(120)
                fd(100)
And this one?
                fd(100)
                lt(180)
                fd(200)
                lt(180)
                fd(100)
                lt(90)
                fd(50 + 50)  # wow, that's pretty!
                lt(90 * 2)
                fd(40 + 80 * 2)
Nous voyons que la tortue est une super calculette ! Bien mieux que cet objet des années 80, crois-moi.
Remarque que la dernière ligne fait avancer la tortue de 200 pixels, car dans une calculette, le × se fait avant le +, et donc 40 + 80 * 2 = 40 + 160 = 200, c'est la priorité des opérations.
Tapper tout ça c'était un peu lent n'est-ce pas ? As-tu pensé à faire Copier-Coller ?
- Sélectionne le texte :
- Met ta souris à gauche du premier caractère (
f), - Maintient le clic enfoncé,
- Déplace ta souris jusqu'à droite du dernier caractère (la parenthèse fermante
)), - relâche le clic.
- Met ta souris à gauche du premier caractère (
- Clic droit (clic de droite, en utilisant ton majeur)
- Sélectione Copier dans le menu (raccourci Ctrl+C).
- Clique dans la zone de texte à droite.
- Clic droit → Coller (raccourci Ctrl+V).
Complex shapes
Exercise 3: The square
Now, you are going to write the code! Try to draw a square of side 80.

Exercise 4: The house
More difficult, this house :
If you're a little lost, there's a hint below the drawing 😉

If you struggle with angles, here are some drawing that can be handy:
Click on the image to see next image


You can also write speed(10) at the beginning of your code so that the turtle will move faster.
Small question, which lines of code you have to change so that the door is higher?
Save this code in a new file to reuse it afterwards!
Be careful to end the filename with .py like on the picture.

Et puisque je suis gentil, voici une correction de la maison en vidéo... ah, elle n'est pas encore faite cette vidéo ^^
Voici le code qui a été (qui va être...) produit dans la vidéo :
Pen and colors
penup/pendown

The new command penup() (shortcut pu() or up())
can lift the pen up, so that the turtle can move without drawing.
We also have, pendown() (shortcut pd() or down()) to put the pen back down for more drawing.
What is this code doing?
                fd(25)
                penup()
                fd(50)
                pendown()
                fd(25)
color
The new command color("red") (beware of the quotes in "red"!)
changes the color of the pen to red.
Other colors exist like green, blue, yellow
and many others.
To have all the existing colors, we go in Paint:
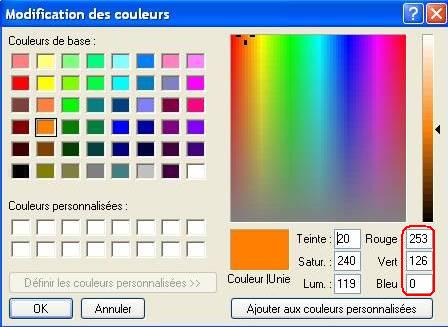
For this amazing orange, I will write the command
color(253, 126, 0)
In order to pick any color, we can google color picker.
A lot of tools give the color hexadecimal code (hex code), for example I have a nice pink written #ff0060 that can be inserted using
color("#ff0060") or color(0xff, 0x00, 0x60).
                fd(30)
                color("yellow")
                fd(30)
                color("red")
                fd(30)
                color(253, 126, 0)
                fd(30)
                color("#ff0060")  # color(0xff, 0x00, 0x60)
                fd(30)
Let's notice that, if color(253, 126, 0) gives you an error, write colormode(255) at the beginning of your program.
Therefore, color is a mix of red, green et bleu and these components are often displayed in various forms. Let's take my favorite orange, it can be written... 
- As percentages:
100%, 60%, 0%, meaning 100% red, 60% green and 0% blue. - As ratios:
1.0, 0.6, 0, ratios are between 0 and 1 and are more mathematical than percentages. - With integers ranging from 0 to 255:
255, 153, 0because 153 = 60% 255 = 0.6 × 255 =60 / 100 * 255. - With integers written in hexadecimal:
ff, 99, 0because 255 isffin hexadecimal , 153 is99and 0 is0. Often we write the 3 integers ff, 99, 0 attached on 6 characters with a#in front, like this:#ff9900. - And when both hexadecimal digits for the three components are equal, one does not repeat it:
#f90.
Exercise 5: Two colored squares
Try to draw this:
Lifting the pen using penup() will be useful to separate the two shapes

Exercise 6: House in color
Or you can color your house, the door in red and the roof in green!

Keyboard shortcuts
Seriously, who needs a mouse when editing text? — Robert Vanden Eynde
The mouse, that's slow... But trackpad? That's wooorse! — Robert Vanden Eynde
Here is a list of the most useful keyboard shortcuts to edit text, those work even on Facebook, you don't have to read them but it's useful to write code very fast trust me!
Functions
In order to reuse some code, we can put it in a function. For instance, I will write a function square that allows me to draw a square.
            def square():
              fd(80)
              lt(90)
              fd(80)
              lt(90)
              fd(80)
              lt(90)
              fd(80)
              lt(90)
Write the code above and then the new instruction square() will be available! Then write the code below.
            square()
            lt(45)
            square()
            fd(50)
            square()
We can also add parameters to the function, thanks to them we can vary some part of the code, like the size of the square.
            def square(s):  # s is the size
              fd(s)
              lt(90)
              fd(s)
              lt(90)
              fd(s)
              lt(90)
              fd(s)
              lt(90)
We will use it like this:
                fd(100)
                square(80)
                lt(45)
                square(40)
                fd(50)
                square(60)
You can name the s parameter as you want,
like s, size, x, a or side_size.
We can add all the parameters we want, separated by commas, like def square(size, the_color).
We can do some maths like 50 + size * 2 - (size - 1), be careful of the priority of operations!
A little keyboard shortcut to shift lines to the right: select the lines you want to shift and hit Tab ↹. The reverse operation can be done via ⇧Shift+Tab ↹.
Exercise 8: House patterns
You can find the code of the house here, put in in a function with two parameters so that you can draw a house with one line:
                house(40, "red")
                house(60, "blue")
The parameters are the height and the color of the door.

Loops
In the code for drawing a square, we have four times the same code in a row
                fd(40)
                lt(90)

                fd(40)
                lt(90)

                fd(40)
                lt(90)

                fd(40)
                lt(90)
There exists an instruction that gives you the opportunity to say Repeat 4 times what follows, it's the for:
        for i in range(4):
          fd(40)
          lt(90)
Be careful to not forget the :, to enter a new line and to write at least one instruction.
What will be the difference with the following code? The only difference is the absence of few space characters but it changes the result a lot! Test it and understand why the rendered result corresponds to the code.
        for i in range(4):
          fd(40)
        lt(90)
Exercise 9: The hexagon
Try to draw an hexagon, do not hesitate to use the for to simplify your code!

Exercise 10: Some triangles
Write a function triangles, that will draw the following shape, add the parameters size and the_color in order to call it like this:
triangles(20, "red")With the help of loops, this figure can be drawin in less than 10 lines!

Exercise 11: The village
Use loops and your house function to create easily a village with two streets like this:

Masterpiece
Exercise 12: Your masterpiece
Last challenge for that course, let your imagination go to create a nice drawing!
Here's mine, it uses my function triangles multiple times!

It's over, we have learned to use turtle by programming in the python language.
There exist other turtle commands.
Videogames programming
Check here my videogames programming course to create some small 2D games! Currently the names of the files are in french only (I'm currently translating the content) but almost all words are almost the same in english (théorie is theory, exercice is exercise, etc.)
To know more
Here is an overview of other turtle/python functionalities.
We can create multiple turtles (python objects):
            bob = Turtle()  # or Pen()
            bob.shape("turtle")
            bob.color("blue")
            bob.forward(50)
            alice = Turtle()
            alice.shape("turtle")
            alice.color("green")
            alice.fd(100)
And create variables dependent of the turtle.
            bob.displacement = 5
            alice.displacement = 10

            def forward_with_dashes(the_turtle):
              for i in range(3):
                the_turtle.penup()
                the_turtle.fd(the_turtle.displacement)
                the_turtle.pendown()
                the_turtle.fd(the_turtle.displacement)

            bob.lt(90)
            alice.lt(90)

            forward_with_dashes(bob)
            forward_with_dashes(alice)
Or create list of turtles:
            the_list = [bob, alice]
            charles = Turtle()
            charles.shape("turtle")
            charles.displacement = 7
            liste.append(charles)

            for the_turtle in the_list: #  for every turtle in the list
              previous_color = the_turtle.color() # we save the color
              the_turtle.color("blue")
              forward_with_dashes(the_turtle)
              the_turtle.color(previous_color) # we restore the prevous color
Or write conditions to change the logic:
            penup()
            fd(-100)
            n = 0
            for i in range(45):
              penup()
              fd(20)
              pendown()
              fd(20)
              n = n + 1
              if n == 4:
                right(90)
                color("red")
              else:
                if n == 7:
                  right(90)
                  color("blue")
                else:
                  if n == 9:
                    right(90)
                    n = 0
Et finalement, on peut faire des fonctions récursives :
            def tree(t):  # how to make a tree of size t?
                if t < 10:  # if t is smaller than 10...
                    return  # let's do nothing

                if t < 20:
                    color("green")
                else:
                    color("brown")

                fd(t)  # let's go forward by t

                lt(30)  # let's turn
                tree(t * 0.7)  # let's do a smaller tree
                rt(60)
                tree(t * 0.7)  # let's do another smaller tree
                lt(30)

                penup()
                fd(-t)  # let's go back where we started
                pendown()

            speed(10)

            up()
            lt(90)
            fd(-200)
            down()

            tree(100)
Exercise 13: The variable village
Try to make houses with variable sizes:

Bye bye and for any question, I'm available by mail via robertvandeneynde[at]hotmail.com